Nutanix Block Startup / Shutdown Powershell Scripts

Anyone who has Nutanix lab blocks that need to be started / stopped frequently may appreciate these scripts.

Upgrade Nutanix 1350 block to ESXi 5.5

Nutanix recommends that you upgrade to vSphere 5.5 using the VMware Update manager instead of directly mounting the ISO.

Another way to upgrade instead of installing Update Manager is to just download the offline bundle and run the command:

esxcli software vib update –d “FILEPATH to OFFLINE BUNDLE”

Here are the steps that I used to upgrade my nodes from ESXi 5.0.0 to ESXi 5.5.

  1. Download ESXi 5.5 bundle from VMware.
  2. Upload the bundle to the root of my Nutanix datastore

    image

  3. SSH to the CVM.  From the CVM we can execute a script that will run on all of the hosts:

    for i in hostips; do echo $i && ssh root@$i "esxcli software vib install -d /FILEPATH TO OFFLINE BUNDLE"; done

    *I missed that the hostips is encapsulated with backticks and not ‘’ single quotes so I just logged onto each host and ran “esxcli software vib install –d /FILEPATH TO OFFLINE BUNDLE”

    image

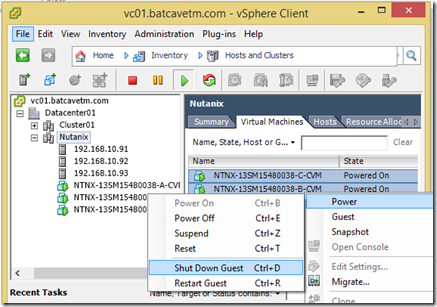
  4. Shutdown the CVM.  We are able to shut down one CVM at a time without disrupting the state of the cluster.   Then reboot the host.

     image

  5. Rut-roh!  My host didn’t come back into vCenter.  When I try to force it to reconnect it tells me that some virtual machines powered back on without following the cluster EVC rules.  Upgrading to ESXi 5.5 must have reset the EVC setting on that host.

    image

    To remedy it I shut down the CVM, force the host to reconnect, then power the CVM back on.  On the next node I just put the host into maintenance mode before I reboot.

Upgrade to Nutanix OS 3.5.2.1 from 3.1.3

My 1350 lab block came with Nutanix OS 3.1.3.  A block refers to a 2U chassis with 4 nodes (or in my case 3, as that is the minimum number of nodes required to create a storage cluster) and Nutanix OS refers to the abstracted virtual storage controller and not the bare metal hypervisor.

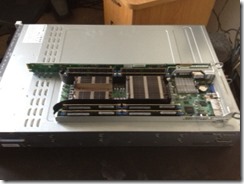
Below is a node that I have removed that is sitting on top of the chassis.

node

The bare metal server node is currently running VMware ESXi 5.0 and the Nutanix OS runs as a virtual machine.  All of the physical disks are presented to this VM through the use of Direct PassThru.

The latest version of Nutanix OS is 3.5.2.1, so I want to run through the upgrade procedure.

  1. Log onto a Controller VM (CVM – another name for Storage Controller or Nutanix OS VM).  Run the following command to check for the extent_cache parameter.

    for i in svmips; do echo $i; ssh $i "grep extent_cache\~/config/stargate.gflags.zk"; done

    image

    If anything is returned other than No such file or directory, or a parameter match is returned, the upgrade guide asks you to contact Nutanix support to remove this setting.

  2. We need to confirm that all hosts are part of the metadata store with the following command:

    nodetool –h localhost ring

    image

    Hmm… Running that command seems to have returned a haven of errors.  Maybe my cluster needs to be running for this command to work?  Let’s try “cluster start” and try this again.

    image

    Ok, that looks more like what I’m expecting to see!

  3. I’m skipping the steps in the guide that say to check the hypervisor IP and password since I know they’re still at factory default.  Now I need to enable automatic installation of the upgrade. 

     image    

  4. Log onto each CVM and remove core, blackbox, installer and temporary files using the following commands:

    rm –rf /home/nutanix/data/backup_dir
    rm –rf /home/nutanix/data/blackbox/*
    rm –rf /home/nutanix/data/cores/*
    rm –rf /home/nutanix/data/installer/*
    rm –rf /home/nutanix/data/install
    rm –rf /home/nutanix/data/nutanix/tmp
    rm –rf /var/tmp/* 

    image

  5. The guide says to check the CVM hostname in /etc/hosts and /etc/sysconfig/network to see if there are any spaces.  If we find any we need to replace them with dashes.

    image

    image

    No dashes here!

  6. On each CVM, check that there are no errors with the controller boot drive with the following command:

    sudo smartctl –a /dev/sda | grep result 

    image

  7. If I had replication, I would need to stop it before powering off my CVMs.  However, since this is a brand new block, it’s highly unlikely that I have it set up.

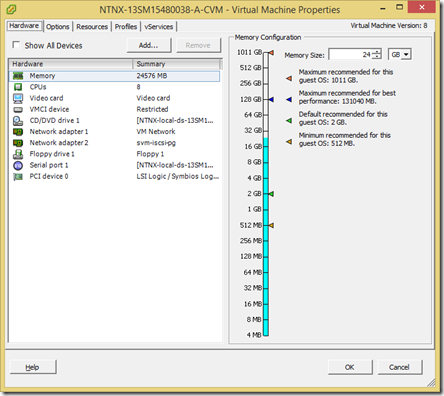
  8. Edit the settings for the CVM and allocate 16GB of RAM, or 24 GB of RAM if you want to enable deduplication.  In production, this requires shutting down the CVMs one at a time, changing the setting, then powering the CVM back up, waiting to confirm that it is back up and part of the cluster again, and then shutting down the next CVM to modify it.  However, since there are no production VMs running in the lab I can just stop the cluster services, shutdown all of the CVMs, make the change, and then power them all back on.

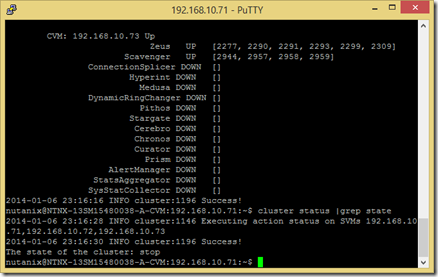
    To stop cluster services on all CVMs that are part of a storage cluster log onto the CVM and use the command:

    cluster stop

    image 

    We can confirm that cluster services are stopped by running the command:

    cluster status | grep state

    We should see the output: The state of the cluster: stop.

    image

    We can now use the vSphere client, vSphere Web Client, PowerCLI, or whatever floats your boat to power off the CVMs and make the RAM changes.

    image

    image

  9. Power the CVMs back on, grab a tasty beverage of your choice, then check to see if all of the cluster services have started using: cluster status | grep state.  The state of the cluster should be “start”.

  10. Next we need to disable email alerts:
    ncli cluster stop-email-alerts

  11. Upload the Nutanix OS release to /home/nutanix on the CVM.  Or if you’re lazy like me just copy the link from the Nutanix support portal and use wget.

     image

  12. Expand the tar file:

    tar –zxvf nutanix_installer*-3.5.2.1-* (or if you’re lazy tab completion works as well)

    image

  13. Start the upgrade
    /home/nutanix/install/bin/cluster –i /home/nutanix/install upgrade

    Here we go!

    image

  14. You can check the status of the upgrade with the command upgrade_status.

    image

    You’ll know the upgrade is progressing when the CVM that you’re logged into decides to reboot.

    image

    8 minutes later… One down two to go!

    image

    11 minutes in…

    image

    13 minutes later… up to date!

    image

  15. Confirm that the controllers have been upgraded to 3.5 with the following command:

    for i in svmips; do echo $i; ssh -o StrictHostKeyChecking=no $i \cat /etc/nutanix/svm-version; done

    image

  16. Remove all previous public keys:

    ncli cluster remove-all-public-keys

    image

  17. Sign in to the web console:

    image

    Behold the PRISM UI!

     image

Copy files between ESXi hosts using SCP

Need a quick way to move files on one datastore to the datastore of another host that is not within the same vCenter?

In a Nutanix environment SSH is enabled on the hosts so we can use SCP to do this.  I needed to move an ISO repository from the production cluster to the TEST / DEV cluster.  Log into the source host as root, change directory to the datastore folder  (/vmfs/volumes/DATASTORE/FOLDER) and then run the following command:

scp –r * root@DESTINATION:/vmfs/volumes/DATASTORE/FOLDER

# The destination FOLDER must already exist on the destination DATASTORE.

Export Teradici PEM cert from Windows

We deployed certs on our View Connection Servers on one of our projects and needed to put our CA’s root cert on the zero clients.  The zero clients expect the cert in PEM format.  Turns out that this format is just a Base 64 encoded X.509 cert that you can export from windows.

Open the cert in windows either through the certificates mmc or by double clicking on the cert file.  Click on the Details tab then click Copy to file…

image


Click Next.

image


Click the radio button Base-64 encoded X.509 (.CER)

image


Specify the path where you want to save and click next.

image 


Click Finish.

image


Using your favorite method, simply change the file extension from .cer to .pem.

image

In the PCoIP Manager click the Profiles tab and then click Set Properties.

image

At the very bottom of the page you’ll find the Certificates section.  Click Add New.

image

Select the .pem cert file that you just renamed and click Add.

image

You will see that the cert has been successfully added and you can push it out in your zero client profile.

image

Use a Script to Power On/Off a Nutanix Block

Nutanix is able to accept IPMI commands from the command prompt.  This requires use of the ipmiutil tool.

The following are examples of how to power on and off the nodes using the command line:

Power Up:
ipmiutil reset –u -N node –U username -P password
Example: ipmiutil reset –u -N 192.168.1.1 –U ADMIN -P ADMIN

Power Down:
ipmiutil reset –d -N node –U username -P password
Example: ipmiutil reset –d -N 192.168.1.1 –U ADMIN -P ADMIN

Migrate VMs on Nutanix from one cluster to another without Live Migration

One of the great things about Nutanix is that you can add nodes one at a time and grow your storage cluster.  One of the bad things about Nutanix is that there really isn’t a way to remove a node from a cluster (yet) without doing a cluster destroy.  Cluster destroy is basically game over for that cluster, it removes all of the nodes and puts them back to factory restore mode, as in they look as when they arrived from the factory.

So what happens when you buy a few more blocks from Nutanix, create a new cluster, and need to migrate your production VMs from the old cluster to the new cluster?

We ran into a situation where we had our production servers running on Nutanix 3450 blocks, and needed a bit more oomph, so we purchased Nutanix 3460 blocks which support 512GB RAM per node instead of 256GB and have 10 core CPUs instead of 8.  We could have added these nodes to the same cluster except that we wanted to take the old nodes and add them to our VDI cluster.  (We haven’t performed any performance testing on the solution of just having one cluster mixing VDI and server workloads, so we decided to play it safe and segregate the clusters).

So how do we migrate 6TB of production VMs all in one night and maintain application consistency?  Live Migration!?  Well, we could have tried it, but upgrading to vSphere 5.5 SSO seems to have killed our vSphere webclient.  Support ticket opened… Yay VMware for not including live migration in the Windows client because it’s not like we still need that supported for SRM or Update Manager or anything because that is fully supported by the webcli…. oh.  Also I’m sure that as soon as they get everything working in the webclient that 95% of their enterprise customers are going to ditch windows because finally it will be the year of the linux deskt… oh.

Meanwhile back at the ranch, we need to get these VMs over to the new cluster.  I guess we’re going to power them off and do a storage migration.  Luckily our production servers support a mission that only happens during the day, so powering them off for a few hours isn’t that big of a deal.  Maybe we should test this first.  Test VM created, power off, right click Migrate, start migration and… it’s moving at a whopping 33MB/s.  Hmm… so 6TB/33MB/s = 58hrs 15 minute and 15 seconds to complete.  Uh, I don’t think that’s going to work.  VMware should really add storage migrations to the VAAI API and let the storage vendors figure out how to speed up transfers.

Still, I don’t have 58 hours of downtime to migrate these VMs.  How can I get them migrated in a reasonable time?  Nutanix DR to the rescue!

All of the gory details about how DR works is a separate blog post.  Let’s suffice it to say that I did the following:

#Log into CVM and open firewall ports for DR
for i in svmips; do ssh $i "sudo iptables -t filter -A WORLDLIST -p tcp -m tcp –dport 2009 -j ACCEPT && sudo service iptables save"; done

#Create the remote site of new cluster on old cluster
remote-site create name=NEW_CLUSTER address-list="10.xxx.xxx.2" container-map="OLD_DATASTORE:NEW_DATASTORE" enable-proxy="true"

#Create the remote site of old cluster on new cluster
remote-site create name=KEN address-list="10.xxx.xxx.1" container-map="NEW_DATASTORE:OLD_DATASTORE" enable-proxy="true"

#Create the protection domain
pd create name="PRODUCTION"

#Add my production server VMs to the protection domain
pd protect name="PRODUCTION" vm-names=PROD01,PROD02,PROD03 cg-name="PRODCG"

#Migrate the production VMs
pd migrate name=”PRODUCTION” remote-site=”NEW_CLUSTER” 

This operation does the following:
1. Creates and replicates a snapshot of the protection domain.
2. Shuts down VMs on the local site.
3. Creates and replicates another snapshot of the protection domain.
4. Unregisters all VMs and removes their associated files.
5. Marks the local site protection domain as inactive.
6. Restores all VM files from the last snapshot and registers them on the remote site.
7. Marks the remote site protection domain as active.

#Check that replication started
pd list-replication-status

You will see an output similar to below on the sending cluster:

ID 2345700
Protection Domain PRODUCTION
Replications Operation Sending
Start Time 01/11/2014 20:35:00 PST
Remote Site NEW_CLUSTER
Snapshot Id 2345688
Aborted false
Paused false
Bytes Completed 2.72 GB (2,916,382,112 bytes)
Complete Percent 91.117836

On the receiving cluster you will see:

ID 4830
Protection Domain PRODUCTION
Replications Operation Receiving
Start Time 01/11/2014 20:35:00 PST
Remote Site OLD_CLUSTER
Snapshot Id OLD_CLUSTER:2345688
Aborted false
Paused false
Bytes Completed 2.72 GB (2,916,382,112 bytes)
Complete Percent 91.117836

If you want to watch the replication status a helpful command to know is the linux command watch.  The command below will update the status every 1 second.

watch –n 1 ncli pd list-replication-status

Since the migration takes two snapshots you will see the replication status reach 100% and then another replication will start for the snapshot of the powered off VMs.

When it gets to 100% on the first snapshot the VMs we be removed from the old cluster in vCenter.  After the 2nd replication completes they will be added to the new cluster.

For our migration the transfer seemed to reach 90% fairly quickly, then took about 1-2 hrs to get from 90-100%.  Perhaps someone from Nutanix can shed some light on what is happening during that last 10% and why it takes so long.

Nutanix 1350

I have been using the Nutanix Virtual Computing Platform 3450 and 3460 appliances on some of my recent projects.  I have been wanting to do some testing to see what these appliances are capable of, I mean other than hosting 5000+ VMware View desktops, but it’s not like I can just go pull one out of production and fire up IOMeter, or install Hyper-V on it, or do some What-If-BadThingsTM happen like a hard drive accidently getting pulled or two nodes decide to power off at the same time.

Nutanix was kind enough to send me a Nutanix 1350 Virtual Computing Platform appliance to do exactly this.  The 1000 series is the little brother to the 3000 series.  Without having received Nutanix Official Sales Training(TM) I should clarify what the series numbers mean:

X (Series Number)
X (Number of Nodes)
X (Processor Type)
X (SSD Drive Capacity)
1 (1000 Series)
3 (3 Nodes)
5 (Dual Intel Sandy Bridge E5-2620)
0 (1-400GB SSD Drive)

Nutanix had also warned me that the appliance is rated to consume 1150W at 10-12A.  With all of the other equipment that I have in the office, my 15A circuit didn’t look like it was going to cut it.  Time for a power upgrade!

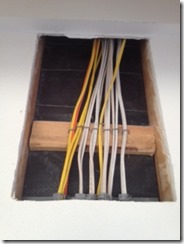
However, something seemed to be missing to complete this power upgrade… attic access!  5 days, 10 trips to Home Depot, a stud finder, 1 new reciprocating saw, and 4 holes in the wall later I had finally installed a new 20A circuit!

This is also probably where I should put the disclaimer:
I am a computer systems engineer and not a licensed electrician.  Any work performed on your own structures must be performed according to your local laws and building codes.  It is highly recommended to have any electrical work performed by a licensed electrician.

Found the back of the electrical panel!

 electrical


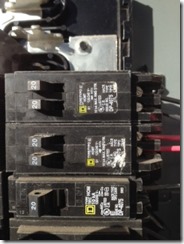
Circuit breaker installed!

20A 


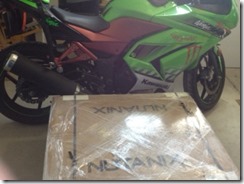
Time for unboxing!

 Nutanix

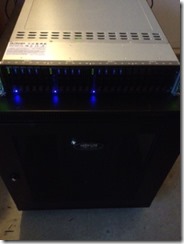
Even though it came with rails, I don’t feel like moving everything around in my lab rack, I want to play!  I’ll just set it on top and rack it later.

nutanix

So now that I have it plugged in, let’s see what this thing is going to cost me to run.  Thanks to Southern California Edison and the California Public Utilities Exchange Commission I’m in Tier 4 which costs $0.31 per kilowatt hour.  At 1.15 kw/hr * 24 hrs per day * 30 days per month * $0.31, I’m looking at a $256.68 increase in my bill next month. 

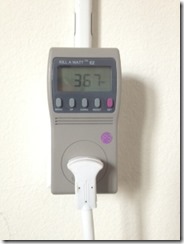
However, I plugged in my Kill-A-Watt meter and it shows me that these 3 nodes are only consuming 367 Watts.  At 0.367 kw/hr * 24 hrs per day * 30 days per month * $0.31, it looks like I’m only going to be paying an additional $81.91.  I realize that these numbers are at idle, so I’ll have to write another post once I get a load spun up.  Also, this load probably could have fit on my existing 15A circuit.  But at least I got to play Tim Taylor over the holiday break and get more power!

kill-a-watt

Use PowerCLI to get an inventory of VMs

Say your boss asks you to plan for expansion and you need to get an inventory of the VMs in your current environment with their resource consumption.  What’s the VMware answer for this?  Oh buy VCOPs… wait that’s right I don’t have 100k that I can drop right now.  Oh there’s a free way to export this to excel?  How would I do that?!  PowerCLI!

To get an inventory of VMs from your ESXi hosts using PowerCLI:

Get-VM | Export-Csv –path “c:\users\josh\desktop\myVMs.csv” –NoTypeInformation

This will export a CSV file with the following fields:

CDDrives
Client
CustomFields
DatastoreIdList
Description
DrsAutomationLevel
ExtensionData
FloppyDrives
Folder
FolderId
Guest
HAIsolationResponse
HardDisks
HARestartPriority
Host
HostId
Id
MemoryGB
MemoryMB
Name
NetworkAdapters
Notes
NumCpu
PersistentId
PowerState
ProvisionedSpaceGB
ResourcePool
ResourcePoolId
Uid
UsbDevices
UsedSpaceGB
VApp
Version
VMHost
VMHostId
VMResourceConfiguration
VMSwapfilePolicy


If you don’t need all of those fields you can select the ones you need with the following syntax:

Get-VM | select Name, Guest, MemoryGB, ProvisionedSpaceGB, UsedSpaceGB | Esxport-CSV –path c:\users\josh\desktop\myVMs.csv –NoTypeInformation

If you don’t type –NoTypeInformation then you will get the following at the beginning of your CSV: #TYPE Selected.Vmware.VimAutomation.ViCore.Impl.V1.Inventory.VirtualMachineImpl

Technologist