P2V Windows to AHV using Disk2VHD

Generally a better idea to build virtual machines from scratch when doing a migration to the datacenter.  However, in some scenarios it might make sense to P2V a machine.   This includes if you need to preserve the exact configuration of an existing machine, or if you don’t have the installation media for programs that are installed on that machine.

Before you begin the P2V process, you need to install the Nutanix VirtIO drivers for the virtual hardware that will be presented to the VM.

Login to the Nutanix support portal, click Downloads, Tools & Firmware, and search for “virtio” to find the drivers.  Download the appropriate .MSI for your version of Windows.
image

Double click the .msi to install it, and just click next and accept all the defaults.
image

Microsoft has a tool called Disk2vhd that you can download for free to accomplish P2V migrations.

Download disk2vhd from Microsoft

Disk2vhd is a simple .exe file.  Double click on the .exe to run it.

If you want the .vhd file to be bootable you need to select the System volume as well as C:\

I recommend saving the .vhd to a volume other than C:\ such as a usb key, or network mounted drive.

image

If the .VHD is relatively small, you can upload it through the PRISM Image Configuration Service.

image

However, if it is fairly large the browser will probably timeout before the .VHD completes the upload.

The Image Configuration Service will also upload a file from a http source.  You can easily create a http server using Microsoft IIS.  In Windows Features, click the following options to install the IIS role:

image

Open IIS Manager, right click Default Web Site, and click Add Virtual Directory.
image

You will also need to add .VHD as a MIME type to be able to download the file.
image

You can then browse to the folder via HTTP, right click the file link, and copy the link to the Image Configuration Service.

image

image

After the Image create tasks reaches 100% you can create a VM with the uploaded vdisk.
image

When adding a new disk to the VM, select:
Operation: Clone from Image Service
Bus Type: SCSI

image

Power on the VM and enjoy your success.

image

Booting from UEFI partions:

If the machine you imaged is booting from a UEFI boot partition the VM will be stuck with the message: Booting from Hard Disk…

image

To enable UEFI booting:

SSH to a CVM
run acli
vm.update [vm name] uefi_boot=true

image

Power off the VM and power it back on.  Happy UEFI booting!

image

Mount Nutanix Container using NFS on Windows 10

Mounting a Nutanix container in Windows can be useful for transferring virtual disks and ISOs to/from a Nutanix cluster.

You must first add your Windows 10 system to the container or filesystem whitelist.

image

Then you need to open Control Panel, Programs, Programs and Features and install Services for NFS, Administrative Tools, and Client for NFS.

image

By default Windows 10 will try to use ports 1-1024 to try to restrict a normal user from posing as a root user.  However, the Nutanix cluster will try to connect back with a much higher port.  To disable this setting open a Command Prompt as Administrator and run:

nfsadmin client localhost config UseReservedPorts=no

image

You can then mount the Nutanix container using Map Network Drive.

image

image

Export an ISO from the Image Service on Nutanix AHV

Nutanix AHV has an image service built into PRISM that lets you upload ISO files and connect them to VMs.  Currently there is no export for the image service built into PRISM. 

image

However, it is not hard to export this ISO if you need to.

Step 1: Find the vmdisk_uuid for the Image

Log into a CVM and go into acli.

List the images using: image.list

Get the details for the image using image.get [Image Name]. 
Example: image.get Windows10

Note the vmdisk_uuid.

image


Step 2: Use a SCP tool to copy the vmDisk

Use a SCP tool like WinSCP to log into the CVM.  You need to log in with a PRISM user/pass to port 2222.  In this example I use the default login “admin”.

image


The .acropolis folder is hidden so use the open folder button to browse to the .acropolis/vmdisk folder.

image


Right click on the UUID and select download.

Screen Shot 2017-02-16 at 10.30.00 AM


Type in a name for the iso.  In this example I name it Windows10.iso

image

image

Export a VM from Nutanix AHV to VMware ESXi

In this example I export a CentOS 7 template from AHV to ESXi.  There are a couple of ways to accomplish this task, depending on whether you need a thin provisioned file or a thick provisioned file.

Thin Provisioned

Step 1: Find UUID of the vDisk.

Connect to a CVM, enter aCLI and run the command vm.get [vm name]

Copy the vmdisk_uuid.  (Notice the size of the VM under the STORAGE column in PRISM, that should be the size of the exported file… assuming the VM only has 1 vdisk)

clip_image001

clip_image002


Step 2: Export the vDisk

vDisks of AHV VMs are located in a hidden folder on the container named .acropolis.  We use the qemu-img command to export the vDisk.  The vdisk is exported in a thin format and should match the size of the VM in PRISM.  If the disk is large then the command might take longer to complete than the timeout value of the SSH session.  In order to not have the conversion corrupted by the SSH session timing out either use keep alives or run the task in the background by using a ‘&’ at the end of the command.  In this example I will run the task in the background.

Make sure the VM is powered off, then run the following command:

qemu-img convert –O vmdk nfs://127.0.0.1/[container]/.acropolis/vmdisk/[UUID] nfs://127.0.0.1/[container]/[vmdisk].vmdk &

Example:
qemu-img convert -O vmdk nfs://127.0.0.1/Nutanix/.acropolis/vmdisk/fea6b382-43ec-4236-b521-edac7ac923cb nfs://127.0.0.1/Nutanix/CentOS_7.vmdk &

We can check that the task is still running using the command PS –A | grep qemu.  When the command returns nothing we know it has completed.

clip_image003


Step 3: Copy the vDisk

Once the export completes, you can now whitelist a Windows 2012 R2 server and simply browse to the container and copy the vDisk.  Alternatively you can also use a SCP tool  by connecting with admin@[host]:2222.

clip_image004

clip_image005


Step 4.  Create a new Virtual Machine and Upload the VMDK to ESXi.

Here I create a new VM with no virtual disk, because I am going to upload the VMDK to the VM’s folder.
clip_image006

Use a SCP tool to connect to ESXi and upload the VMDK to the VM’s folder.

clip_image007


Step 5: Use vmkfstools to create the vmdk disk descriptor.

ESXi expects vmdks to have a disk descriptor file that points to the raw vmdk file.  We can use vmkfstools to create that using the following command:

vmkfstools –i [sourceVMDK] [destinationVMDK] –d thin
Example:
vmkfstools –i CentOS_7.vmdk CentOS7.vmdk –d thin
Once the disk descriptor is created you can delete the original file.
clip_image008


Step 6: Attach the VMDK to the VM and power it on

clip_image009

clip_image010


Thick Provisioned

Exporting a thick provisioned disk is similar to the process above, except we don’t need to use qemu.  We can just SCP the disk from the .acropolis directory.

Step 1: Find UUID of the vDisk.

Connect to a CVM, enter aCLI and run the command vm.get [vm name]

Copy the vmdisk_uuid.  (Notice the size of the VM under the STORAGE column in PRISM, that should be the size of the exported file… assuming the VM only has 1 vdisk)

clip_image011

clip_image012


Step 2: SCP the vdisk from the .acropolis/vmdisk directory.

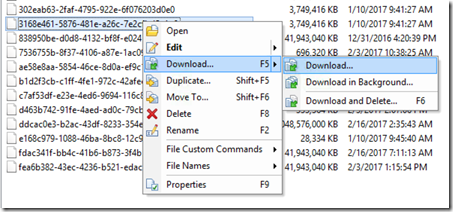
Use a SCP tool to connect to the Nutanix CVM.  If you use WINSCP you will have to use the Open Directory button (CTRL+O) to open the hidden .acropolis/vmdisk directory.

clip_image013

clip_image014

Copy the vDisk that matches the UUID from vm.get. Then copy the file to ESXi.
clip_image015


Step 3.  Create a new Virtual Machine and Upload the VMDK to ESXi.

Here I create a new VM with no virtual disk, because I am going to upload the VMDK to the VM’s folder.
clip_image016

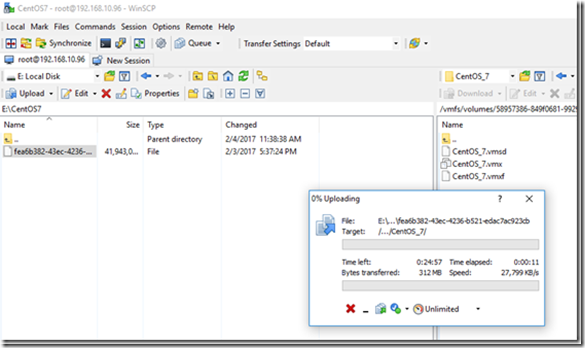
Use a SCP tool to connect to ESXi and upload the VMDK to the VM’s folder.

clip_image017


Step 4: Use vmkfstools to create a VMDK descriptor file, then replace the flat file with the exported vDisk.

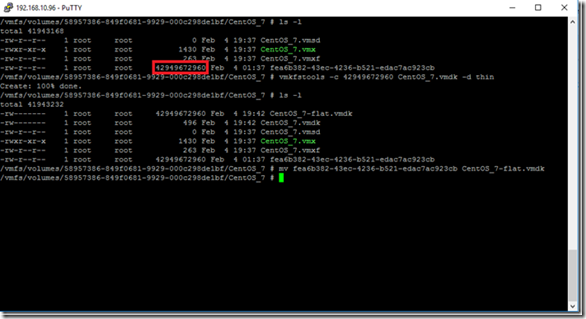
Following the process in VMware KB 1002511 we recreate a vDisk descriptor file.  The file has to be created with the exact same size as the exported vDisk.  Use ls –l to check the size of the exported vDisk.  Then use the following command to create the vDisk descriptor file:
vmkfstools –c [vDisk size] [destination file] –d thin

Example:
vmkfstools -c 42949672960 CentOS_7.vmdk -d thin

Once the file is created then replace the –flat.vmdk file with the exported vDisk.
Example:
mv fea6b382-43ec-4236-b521-edac7ac923cb CentOS_7-flat.vmdk

clip_image018


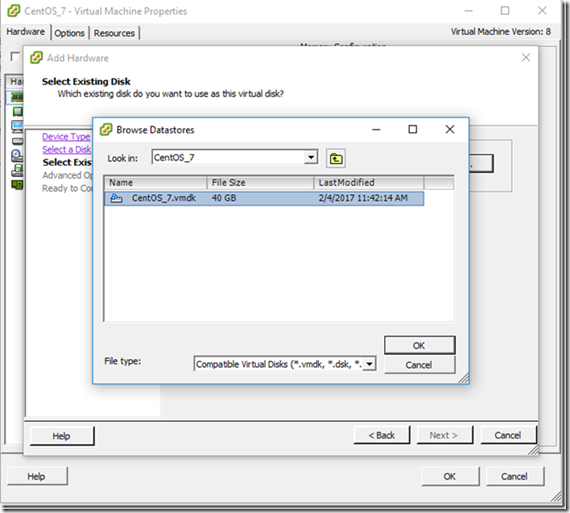
Step 5: Attach the VMDK to the VM and power it on

clip_image019

clip_image020

Export a VM from AHV raw format to VMware VMDK

In this example I’m going to export my Windows 2012 R2 template from AHV to ESXi.

Step 1: Find UUID of the vDisk.

Connect to a CVM, enter aCLI and run the command vm.get [vm name]

Copy the vmdisk_uuid.  (Notice the size of the VM under the STORAGE column in PRISM, that should be the size of the exported file… assuming the VM only has 1 vdisk)

image

image


Step 2: Export the vDisk

vDisks of AHV VMs are located in a hidden folder on the container named .acropolis.  We use the qemu-img command to export the vDisk.  The vdisk is exported in a thin format and should match the size of the VM in PRISM.

Make sure the VM is powered off, then run the following command:

qemu-img convert –O vmdk nfs://127.0.0.1/[container]/.acropolis/vmdisk/[UUID] nfs://127.0.0.1/[container]/[vmdisk].vmdk

Example:
qemu-img convert -O vmdk nfs://127.0.0.1/Nutanix/.acropolis/vmdisk/838950be-d0d8-4132-bf8f-e02411807cf2 nfs://127.0.0.1/Nutanix/win2012r2.vmdk


Step 3: Copy the vDisk

Once the export completes, you can now whitelist a Windows 2012 R2 server and simply browse to the container and copy the vDisk and import it into ESXi.  Alternatively you could just mount the container as NFS on the ESXi host and storage vMotion it to another datastore.

image


Step 4.  Create a VM with the new vdisk and power it on.  Remember to install VMware Tools.

image

Export a VM on AHV

Step 1: Find UUID of the vDisk.

Connect to a CVM, enter aCLI and run the command vm.get [vm name]

Copy the vmdisk_uuid.

image

image

Step 2: Export the vDisk

vDisks of AHV VMs are located in a hidden folder on the container named .acropolis.  We use the qemu-img command to export the vDisk.  One cool thing is that the vDisk is exported in a thin format, so even if it is provisioned as a 100GB drive, it will only export the actual size used.

Make sure the VM is powered off, then run the following command:

qemu-img convert –c nfs://127.0.0.1/[container]/.acropolis/vmdisk/[UUID] –O qcow2 nfs://127.0.0.1/[container]/[vmdisk].qcow2

Example:
qemu-img convert -c nfs://127.0.0.1/Nutanix/.acropolis/vmdisk/5c0996b9-f114-475f-98c0-ea4d09e8e447 -O qcow2 nfs://127.0.0.1/Nutanix/export_me.qcow2

Step 3: Copy the vDisk

Once the export completes, you can now whitelist a Windows 2012 R2 server and simply browse to the container and copy the vDisk.

image

Use Cluster Host_Upgrade to Automatically install VMware Patches on Nutanix

Many Nutanix customers running VMware today use VMware Update Manager (VUM) to apply patches.  Unfortunately VUM does not understand the process of shutting down one CVM at a time and rolling through the cluster.  With this process you can use leverage the back end of the One Click Hypervisor Upgrade feature, sit back, and grab a sandwich while your patch is applied.

Step 1: Nutanix Hypervisor Upgrade Requirements

Disable hypervisor lockdown mode on the hypervisor host

Enable vSphere HA and the following settings:

  • Enable Host Monitoring
  • Disable Admission Control > Select: Do not reserve failover capacity. Allow VM power on operations that violate availability constraints
    image

Enable vSphere DRS and these settings:

  • Power Management > Off

vCenter Server Settings > Advanced Settings

  • config.migrate.test.CompatibleNetworks.VMOnVirtualIntranet value of false


Step 2: Download Patch from myVMware

image

Click on the Build Number KB and copy the md5sum of the patch.

image


Step 3: Upload Patch to a CVM

In this example I put the patch in /home/nutanix/tmp

image


Step 4: Run the cluster host_upgrade command

On the CVM that you uploaded the patch to run:

cluster –md5sum=[md5sum of patch] –bundle=[file path to patch] host_upgrade

image

image

image

Step 5: Sandwich run!

The Tesla of the Datacenter

A few months ago I was in the market for a new car.  I have three children so safety features were an important thing to consider.  I also live in California so fuel economy was an important factor as well.

There were lots of different models to choose from: sedan, fullsize, SUV as well as a variety of manufacturers … which one met my requirements?

The engineer in me built an internal capabilities matrix:

Wheels Model A Model B
Seat Capacity 5 8
MPG 30 18
Brakes Drum Disc
Entertainment System No Yes
Price $ $$$

No one really buys a car based on a capabilities matrix.  Also, I would argue that while price is an important factor people don’t buy cars primarily based on price.  People buy cars based on overall value, utility, and the quality of the product.

If I was trying to satisfy my basic requirement of mobility I could buy any vehicle with 4 wheels.  However, since I wanted to transport my kids I considered a vehicle with a built in entertainment system.  The entertainment system had nothing to do with the mobility requirement, but has everything to do with the quality of the mobility.  The entertainment system makes transporting kids easier and makes the ride a much better experience for everyone.

I could have bought a basic vehicle and added an aftermarket entertainment system.  However I would then need to install the system, run wires, mount some kind of awkward interface, etc.  To me, the integrated entertainment system provides value because it comes ready at time of purchase and with one button I can get the kids quiet and enjoy the drive.  It also saves me the time and cost of integrating the aftermarket solution.


Tesla of the Datacenter

Tesla is without a doubt revolutionizing the automobile industry.  Tesla’s competitors are behemoths.  They are saying that Tesla is just another me-too alternative vehicle that has no future, while internally they are desperately trying to figure out how to develop products that match the capabilities of the Tesla.  Nutanix is trying to revolutionize the enterprise datacenter the same way that Tesla is trying to revolutionize the automobile.

Neither Tesla nor Nutanix are able to compete with the bare bones economy product of their competitors.  It’s expensive to hire rock star engineers to develop a product, amazing marketing people to advertise, veteran support engineers… it would be impossible to compete with an automated factory churning out economy products.

In order to compete with the existing behemoths in their marketplace Tesla and Nutanix must accomplish both of these things:

1. Create a product that is unique and provides value in their market
2. Provide insane customer service and support

Unique in the market
Nutanix found its foothold in the VDI market by providing storage that delivered the needed performance, granular scalability and was bound only by the physical constraints of the datacenter.  The early VDI users soon realized that it was so much more efficient than SAN that they started to run server workloads on Nutanix.  The Nutanix operating system then evolved.  Now in addition to the initial storage product it includes integrated management, global management, file management, VM snapshots, backups, analytics, security, REST API, hardware monitoring, alerting, Disaster Recovery, one click firmware and software upgrades, application mobility, cloud migration, capacity planning, and multiple hypervisor support.  This is what makes Nutanix unique and valuable… This isn’t a suite of products or virtual appliances marketed as a single product, all of the features are actually all integrated in the same software!  Nutanix has true feature integration, not just marketing integration.

As a Nutanix customer this integration provided real value to me since I didn’t have to spend my time trying to get the multiple components of a software suite to try to talk together.  It’s the same reason you buy the car with all the features already integrated, that value is that you drive it off the lot and have everything work at the touch of a button.

Insane customer service and support
Nutanix invited their first customer on stage at their .NEXT to kick off the event.  Nutanix really sees their customers as partners… more than just a pile of dollar bills that is up for grabs every time they come into the dealership.  The customers are really what drives the product development.  More than one of the features that I listed above was a request that I had as a customer.

I would love to say that Nutanix is all unicorns and rainbows and makes you toast with orange marmalade, but the reality is that it is a software product, and software will always need maintenance.  As a customer I was impressed by the agility of Nutanix to quickly come up with a workaround and be respond to eliminate bugs and release fixes within a week or two.

Sometimes people forget that support is part of the product too, but it shows up as a line item on the PO!  Nutanix believes that you should actually get great service with that line item, instead of just forking over money so you can download the next software update.

Nutanix also has very experienced support engineers that are not only able to diagnose software issues, but all of the other vendor’s hypervisor platforms that we support as well.

Nutanix has follow the sun support.  As a customer I was impressed when I called at midnight… the guys in Australia that answered was just as capable and knowledgeable as his US counterparts to help me resolve the issue I was having.

Why do I have to pay for it?
I understand why a college kid would want to drive a Tesla, but the reality is that is probably not in their budget, nor will be in their budget for a few more years.  Tesla can’t afford to sell their current product to college kids, they need to pay their engineers, marketing, support, etc.

Nutanix is an enterprise product, targeting mission critical enterprise workloads that need the automation, security and all the other integrated features of Nutanix… way too many features to use simply as a storage platform.  Would you buy all the upgraded features for a vehicle and then never use them?

I understand why a small business would want all of the features that Nutanix provides, but we can’t play in that space and afford to pay our engineers either.  And in reality, a small business’s primary IT infrastructure need is storage.  There are other virtual san storage platforms that would be a great fit these small workloads.

With hard work, however, and the support of our customers, one day we will reach critical mass, scale up production and that college kid can buy a economy version Tesla and the SMB can get small business sized Nutanix. It is only a matter of time.

Nutanix – The difference is SERVICE!

It’s still sinking in that I spent the past week at new hire training for one of the hottest and fastest growing tech startups. I’m joining their federal sales team as a systems engineer.  I am humbled by the opportunity to work with so many great people.

Part of the training comprised meeting all of the senior leadership of the company, each giving a 30-60 minute overview of their role at the company and how to interface with them.  They definitely have the vision and drive to be disruptive to the tech industry.  And passion. It’s not often that you become part of something where everyone you work with has the same passion for the product.

At the end of sales training I went down to a empty conference room on the first floor of Nutanix HQ.  As I sat there getting caught up on email that had filled my new mailbox and messaging my wife about the day I was surprised by the CEO of Nutanix, Dheeraj Pandey.  He popped in and asked me what I had thought of the training.  I told him that it was like drinking kool-aid from a firehose.  I realized by his facial expression that what I had said probably didn’t come out right.  What I would have said if I could get a do over would be something like that coming from a service delivery role I was a little overloaded with information on sales-y type stuff, but felt challenged to practice and hone my messaging so I could share my passion for the product and company… yeah that sounded sales-y.

Obviously I need some practice.   Why would I want to challenge myself by going from service delivery to pre sales?  Because I want to share my passion for the technology and be a part of building the future.

As a kid I was fascinated by tech.  I was always collecting computer parts and getting old hand me down 486s to connect to the internet.  In high school I ran my own web/gaming server in my bedroom.  I was passionate about learning technology.  More than anything else I wanted to work at the local ISP.  I thought if I could get a job there I would be able to get my hands on the latest technology and be part of building the future.  I tried to apply for a job there every year.  Finally when I was 18 I was able to convince them that I was passionate about the technology they had and they relented / gave me a chance and hired me as a help desk tech.

The helpdesk techs were also given the task of taking all of the new sales calls.  We were often asked the question why should we buy your local service for $X when I can get the same service for less somewhere else?  I would have rather been asked how to configure Trumpet Winsock to connect using SLIP on Windows 3.11.

After a couple weeks of fumbling for answers I asked my boss for help.  He asked me a couple of questions.

  1. When you call a company, do you like to wait on hold before you are able to speak to someone?
  2. When your car needs maintenance, do you take it somewhere far away for the work to be performed?
  3. Do you like being able to know the name of the mechanic that performs the maintenance on your car?

My boss explained to me that the difference between us and our competitors was SERVICE!  Our customers preferred our service to our competitors even though we weren’t the least expensive service in town.  It was our responsibility to make sure that we delivered that premium level of service or our customers would leave.  No matter what we should answer the phone before the call queued.  No matter what we should solve our customer’s issue before they got off the phone.  We would even let our customers bring their computer into the shop and we would fix their issue for free if we could.

As a Nutanix customer I experienced the same level of customer service and commitment.  Just one example of this is when HR hired 1000 additional people and told us they were starting in a week.  We panicked.  I’m sure Nutanix panicked when we told them we needed to double our order and needed it before Monday.  Somehow they pulled through and our hardware arrived in less time then I could have even submitted a PO with other vendors.  We met our crazy deadline.  Nutanix even sent someone on-site to help install it… at no additional charge!  And that is the difference between other infrastructure vendors and Nutanix… the difference is SERVICE!

New hire training confirmed to me, like my first boss so many years ago, the message that customer service is THE MOST IMPORTANT THING extends from the senior leadership at Nutanix. They get it.

That day when I added all of the additional hardware for 1000 unexpected VDI users I recognized I had just seen something that I had never seen before.  I powered on the hardware, and a few minutes later I had 1000 additional desktops, without having to configure any LUNs, switches, or cable anything other than power and ethernet.  I had seen the future of infrastructure.  It was the power of the software defined datacenter.  It was webscale.  It was the same feeling that I had when I saw vMotion for the first time and thought holy shit! This changes everything!  This is amazing! I need to learn all that I can about this technology!  This is the future and I need to be a part of building the future!

Two years later Nutanix is giving me a chance to be part of building the future.  I will try my hardest to keep up with these amazing people and continue to share my passion and enthusiasm with all of you.

Use PowerCLI to Automate Disaster Recovery Failover On Nutanix

Using VMware SRM on Nutanix has a few challenges.  SRM expects replication to happen at a datastore level.  By default Nutanix protection domains replicate at a VM level.  It is possible to set up Nutanix replication at a datastore level, but you lose granularity of being able to take VM specific snapshots.  SRM is also dependent on vCenter and SSO.  We were having a few issues that caused us to migrate from the Windows version of vCenter to the vCenter Server Appliance, and in doing so broke SRM so it had to be set up again.  Well, instead of setting it up again, I figured we would get more flexibility if I could do the same thing with PowerCLI.  Unfortunately, Nutanix’s Powershell CMDLET Migrate-NTNXProtectionDomain was published before actually implementing the failover part of the command, so after the script runs you still need to perform the additional step of logging into PRISM and clicking migrate. The script checks to see if the VMs are Windows or Linux. If they are Linux, the script expects a file to be staged called failover, that copies a staged network interface configuration file.

Technologist